In this guide we will look at creating a USB Linux flash drive with persistence. Creating a flash or thumb drive with persistence is a little different to simply making a bootable Linux distro in as much as the persistence makes it possible to save any changes like adding more apps to the operating system, or even updating it. Persistence allows any changes made during the flash drives last use to be available when booted to in the future. Very handy.
There are many ways to create a flash drive with persistence but this guide will focus on what is probably the easiest method. In a future guide we will demonstrate how to create a menu driven bootable flash drive allowing for multiple Linux distributions also with persistence, but for now a simple how to for a single bootable Linux distro.
To create our bootable flash drive with persistence we will need these two things

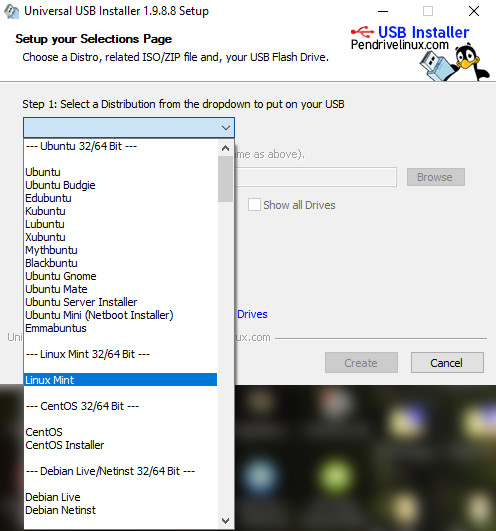
Once started UUI will ask if you agree to the license agreement and after reading it if you are happy to continue click "I agree" This will bring us to the main interface of UUI and we will start at Step 1. Click the down arrow to the right of the now blank box for step 1 and a long list of operating systems and applications will be available to choose from. Here we will scroll down and select Linux Mint.
Whilst it is possible to select any Linux distro or application in the list above and then click the "Download Link" box to the right of your selection, which will automatically direct your browser to enable the download of your selection, it is just as easy to have your preferred distro already downloaded.
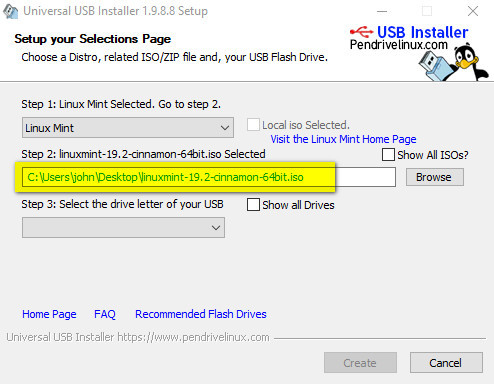
In step 2 click "Browse" to the right of the now blank box and navigate to, and select, your already downloaded iso copy of Linux.
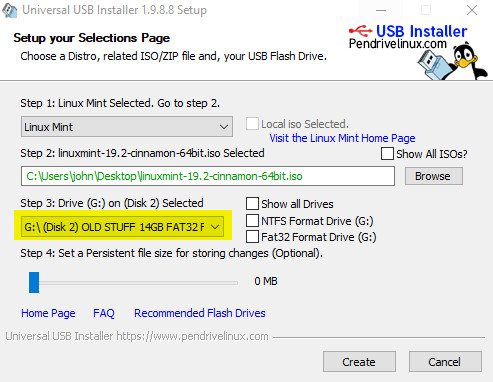
WARNING: Step 3 requires great care because it is here you choose your flash drive for the Linux Mint operating system to be written to. For safety sake please ensure there are no other flash drives, or external drives plugged into your system. Do not select the "Show all drives" box as this will show any internal drives excluding the system drive. This warning may seem harsh but choosing a wrong drive here may cause a loss of important data.
So click the down arrow button in the blank box for step 3 and make sure to select the correct drive. Here we only have one drive because all other external drives are removed and the box for showing all other internal drives is deselected. We will select drive G in this case which is a 16GB USB drive.
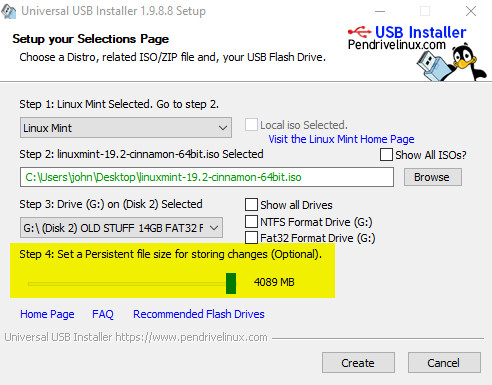
As soon as we select our USB drive to write to some more options will be visible. It will not be necessary to alter any options to the right of the chosen USB drive, but Step 4 sets the amount of persistence required by moving the slider. Obviously the more space for persistence the better and for this guide we will choose the maximum. The amount of persistence will vary with the size of the flash drive. The maximum space for persistence available here is 4GB.
Of course if you wish to create a bootable USB without persistence just leave the slider in step 4 set to zero as shown above.
Review your proposed steps and if OK click on "Create" and UUI will display an overview of what is about to occur. Again double check it's the right drive and click "Yes"
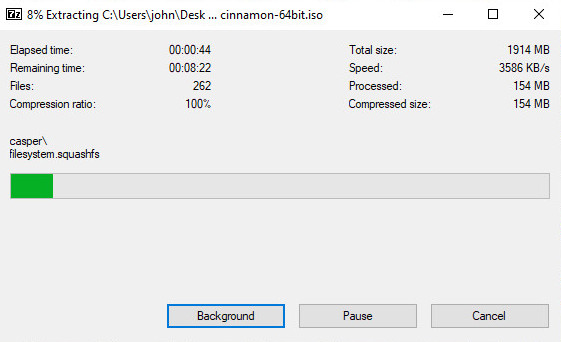
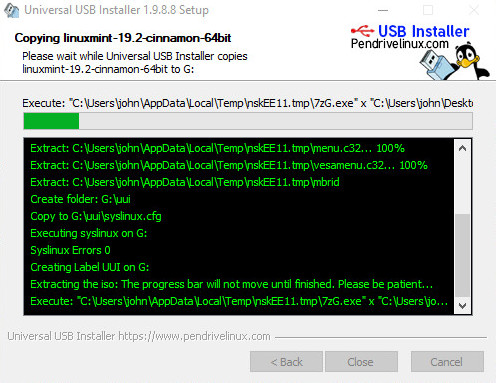
Two boxes will appear and show the progress of extracting the iso and writing to the flash drive. This may take some time depending on the distribution chosen, the flash drive, and the computer.
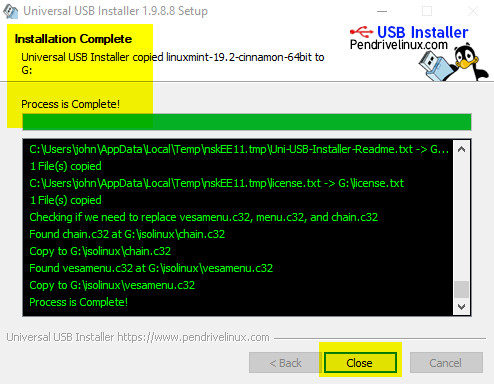
UUI will inform us when the task is complete, click "Close" to finish.
Congratulations, you have created a Linux Mint bootable USB flash drive that will save changes to Mint and allow extra apps to be added and used later on almost any modern computer.
Finally if you decide you no longer want UUI app on your computer just delete the desktop icon or the file you downloaded originally, and that's it, gone.
There are many ways to create a flash drive with persistence but this guide will focus on what is probably the easiest method. In a future guide we will demonstrate how to create a menu driven bootable flash drive allowing for multiple Linux distributions also with persistence, but for now a simple how to for a single bootable Linux distro.
To create our bootable flash drive with persistence we will need these two things
- A downloaded copy of a Linux iso distribution in either 32 or 64 bit. For this guide we will choose Linux Mint Version 19 64 bit, but you can choose almost any other distro.
- A copy of Universal USB Installer which you can get HERE.

Once started UUI will ask if you agree to the license agreement and after reading it if you are happy to continue click "I agree" This will bring us to the main interface of UUI and we will start at Step 1. Click the down arrow to the right of the now blank box for step 1 and a long list of operating systems and applications will be available to choose from. Here we will scroll down and select Linux Mint.
Whilst it is possible to select any Linux distro or application in the list above and then click the "Download Link" box to the right of your selection, which will automatically direct your browser to enable the download of your selection, it is just as easy to have your preferred distro already downloaded.
In step 2 click "Browse" to the right of the now blank box and navigate to, and select, your already downloaded iso copy of Linux.
WARNING: Step 3 requires great care because it is here you choose your flash drive for the Linux Mint operating system to be written to. For safety sake please ensure there are no other flash drives, or external drives plugged into your system. Do not select the "Show all drives" box as this will show any internal drives excluding the system drive. This warning may seem harsh but choosing a wrong drive here may cause a loss of important data.
So click the down arrow button in the blank box for step 3 and make sure to select the correct drive. Here we only have one drive because all other external drives are removed and the box for showing all other internal drives is deselected. We will select drive G in this case which is a 16GB USB drive.
As soon as we select our USB drive to write to some more options will be visible. It will not be necessary to alter any options to the right of the chosen USB drive, but Step 4 sets the amount of persistence required by moving the slider. Obviously the more space for persistence the better and for this guide we will choose the maximum. The amount of persistence will vary with the size of the flash drive. The maximum space for persistence available here is 4GB.
Of course if you wish to create a bootable USB without persistence just leave the slider in step 4 set to zero as shown above.
Review your proposed steps and if OK click on "Create" and UUI will display an overview of what is about to occur. Again double check it's the right drive and click "Yes"

Two boxes will appear and show the progress of extracting the iso and writing to the flash drive. This may take some time depending on the distribution chosen, the flash drive, and the computer.
UUI will inform us when the task is complete, click "Close" to finish.
Congratulations, you have created a Linux Mint bootable USB flash drive that will save changes to Mint and allow extra apps to be added and used later on almost any modern computer.
Finally if you decide you no longer want UUI app on your computer just delete the desktop icon or the file you downloaded originally, and that's it, gone.