My windows 10 laptop recognizes my external hard drive but cannot access it. Error message: D:\ is not accessible; The paramter is incorrect. From what I've read online, chkdsk r/ may take hours or days. Would it be wise to run chkdsk /f first, and see if that corrects the problem? Then, if the drive is still not accesible, run chckdsk /r? I haven't been able to find an answer to that question online. I'm also concerned about the possibilty of losing data on my external hard drive, which I foolishly did not back up! This is my first post on this forum, so please let me know if I've not posted this question in the proper sub-forum. Thank you!
-
Hi there and welcome to PC Help Forum (PCHF), a more effective way to get the Tech Support you need!
We have Experts in all areas of Tech, including Malware Removal, Crash Fixing and BSOD's , Microsoft Windows, Computer DIY and PC Hardware, Networking, Gaming, Tablets and iPads, General and Specific Software Support and so much more.
Why not Click Here To Sign Up and start enjoying great FREE Tech Support.
This site uses cookies. By continuing to use this site, you are agreeing to our use of cookies. Learn More.
Solved Run chkdsk /f BEFORE running chkdsk /r on exernal hard drive?
- Thread starter Lani
- Start date
You are using an out of date browser. It may not display this or other websites correctly.
You should upgrade or use an alternative browser.
You should upgrade or use an alternative browser.

- Status
- Not open for further replies.
First thing that you should be doing is to try and back your data up from the drive, see tutorial below for "how to"
===================
***Required Hardware***
CD Burner (CDRW) Drive,
Blank CD,
Extra Storage Device (USB Flash Drive, External Hard Drive)
===================
1. Save these files to your Desktop/Burn Your Live CD:
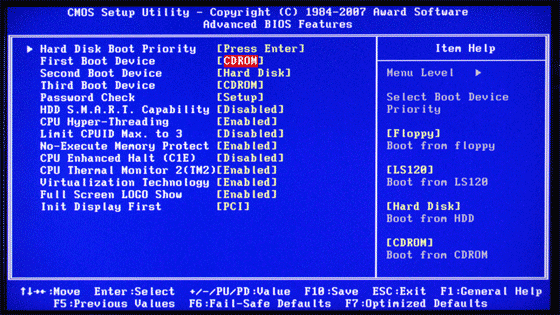
2. Set your boot priority in the BIOS to CD-ROM first, Hard Drive Second
3. Recover Your Data
For computers that have UEFI as opposed to legacy BIOS, to be able to boot from your USB device you may need to disable secure boot and change UEFI to CSM Boot, not all computers and BIOS are the same, please refer to your user manual if you have one as the following steps are only one such example.
Restart the computer, Windows 8 and 8.1 from the Start or desktop screen move your mouse pointer over the upper or lower right corner of the screen, when the Windows Charms appear click the Settings Charm, click on Power and then the Restart option.
Windows 10, Click on Start,Power and then Restart.
While the computer is re-starting,you will need to continually tap or hold down the particular key that will allow you to access the BIOS on your computer, we will use the F2 key as an example here;
After restarting the computer, when the screen goes black, press and hold down the F2 key, wait for the BIOS to load.
Select Security -> Secure Boot and then Disabled.
Select Advanced -> System Configuration and then Boot Mode.
Change UEFI Boot to CSM Boot.
Save the changes and Exit the BIOS, commonly F10.
If your computer will not boot into Windows at all, power up or restart the computer continually tap or hold down the key that will allow you to access the BIOS on your computer and then do the following;
Select Security -> Secure Boot and then Disabled.
Select Advanced -> System Configuration and then Boot Mode.
Change UEFI Boot to CSM Boot.
Save the changes and Exit the BIOS, commonly F10.
===================
***Required Hardware***
CD Burner (CDRW) Drive,
Blank CD,
Extra Storage Device (USB Flash Drive, External Hard Drive)
===================
1. Save these files to your Desktop/Burn Your Live CD:
- Download Latest Puppy Linux ISO (i.e.: lupu-528.iso)
Download BurnCDCC ISO Burning Software
There are instructions on how to boot from flash drive with puppy here; http://www.pendrivelinux.com/put-lucid-puppy-on-usb-flash-drive-from-windows/
- Open BurnCDCC with Windows Explorer
- Extract All files to a location you can remember
- Double Click
BurnCDCC

- Click Browse and navigate to the Puppy Linux ISO file you just downloaded

- Open/Double Click that file
IMPORTANT: Adjust the speed bar to CD: 4x DVD: 1x
- Click Start

- Your CD Burner Tray will open automatically
- Insert a blank CD and close the tray
- Click OK
- Open BurnCDCC with Windows Explorer
2. Set your boot priority in the BIOS to CD-ROM first, Hard Drive Second
- Start the computer/press the power button
- Immediately start tapping the appropriate key to enter the BIOS, aka "Setup"
(Usually shown during the "Dell" screen, or "Gateway" Screen)
- Once in the BIOS, under Advanced BIOS Options change boot priority to:
CD-ROM 1st, Hard Drive 2nd
- Open your ROM drive and insert the disk
- Press F10 to save and exit
- Agree with "Y" to continue
- Your computer will restart and boot from the Puppy Linux Live CD
- Start the computer/press the power button
3. Recover Your Data
- Once Puppy Linux has loaded, it is actually running in your computer's Memory (RAM). You will see a fully functioning Graphical User Interface similar to what you normally call "your computer". Internet access may or may not be available depending on your machine, so it is recommended you print these instructions before beginning. Also, double clicking is not needed in Puppy. To expand, or open folders/icons, just click once. Puppy is very light on resources, so you will quickly notice it is much speedier than you are used to. This is normal. Ready? Let's get started.
3a. Mount Drives- Click the Mount Icon located at the top left of your desktop.

- A Window will open. By default, the "drive" tab will be forward/highlighted. Click on Mount for your hard drive.
- Assuming you only have one hard drive and/or partition, there may be only one selection to mount.
- USB Flash Drives usually automatically mount upon boot, but click the "usbdrv" tab and make sure it is mounted.
- If using an external hard drive for the data recovery, do this under the "drive" tab. Mount it now.
3b. Transfer Files.- At the bottom left of your desktop a list of all hard drives/partitions, USB Drives, and Optical Drives are listed with a familiar looking hard drive icon.
- Open your old hard drive i.e. sda1
- Next, open your USB Flash Drive or External Drive. i.e. sdc or sdb1
- If you open the wrong drive, simply X out at the top right corner of the window that opens. (Just like in Windows)
- From your old hard drive, drag and drop whatever files/folders you wish to transfer to your USB Drive's Window.
For The Novice: The common path to your pictures, music, video, and documents folders for XP is: Documents and Settings >> All Users (or each individual name of each user, for Vista and above C:\Users\$USERNAME\[...]. CHECK All Names!) >> Documents >> You will now see My Music, My Pictures, and My Videos.
Remember to only click once! No double clicking! Once you drag and drop your first folder, you will notice a small menu will appear giving you the option to move or copy. Choose COPY each time you drag and drop.
YOU ARE DONE!!! Simply click Menu >> Mouse Over Shutdown >> Reboot/Turn Off Computer. Be sure to plug your USB Drive into another working windows machine to verify all data is there and transferred without corruption. Congratulations!
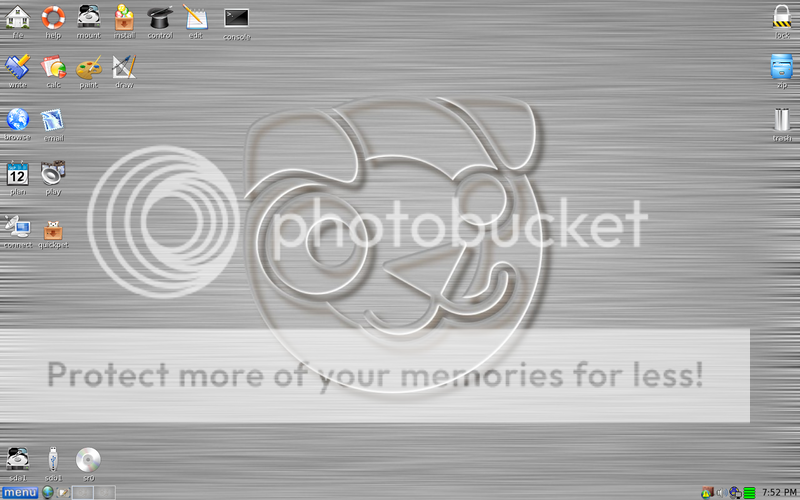
- Click the Mount Icon located at the top left of your desktop.
For computers that have UEFI as opposed to legacy BIOS, to be able to boot from your USB device you may need to disable secure boot and change UEFI to CSM Boot, not all computers and BIOS are the same, please refer to your user manual if you have one as the following steps are only one such example.
Restart the computer, Windows 8 and 8.1 from the Start or desktop screen move your mouse pointer over the upper or lower right corner of the screen, when the Windows Charms appear click the Settings Charm, click on Power and then the Restart option.
Windows 10, Click on Start,Power and then Restart.
While the computer is re-starting,you will need to continually tap or hold down the particular key that will allow you to access the BIOS on your computer, we will use the F2 key as an example here;
After restarting the computer, when the screen goes black, press and hold down the F2 key, wait for the BIOS to load.
Select Security -> Secure Boot and then Disabled.
Select Advanced -> System Configuration and then Boot Mode.
Change UEFI Boot to CSM Boot.
Save the changes and Exit the BIOS, commonly F10.
If your computer will not boot into Windows at all, power up or restart the computer continually tap or hold down the key that will allow you to access the BIOS on your computer and then do the following;
Select Security -> Secure Boot and then Disabled.
Select Advanced -> System Configuration and then Boot Mode.
Change UEFI Boot to CSM Boot.
Save the changes and Exit the BIOS, commonly F10.
Thanks for your response! Sounds complicated, but I'll read through it! By the way, I'm now seeing the following message on my screen: You need to format the disk in drive D: before you can use it--Do you want to format it? Please tell me that this doesn't mean that all of my data on that drive has been erased?!
Puppy is a lot easier on CD but being that we don`t know anything about your notebook we had no way of knowing if it has an optical drive.
That latest message sounds like the data has become corrupted or perhaps even converted to RAW.
Can you upload an expanded screenshot of Disk Manager for us.
Access Disk Management via Run.
Press the Windows+R keys to open Run, type diskmgmt.msc in the empty box then press OK.
To capture and post a screenshot;
Click on the ALT key + PRT SCR key..its on the top row..right hand side..now click on start...all programs...accessories...paint....left click in the white area ...press CTRL + V...click on file...click on save...save it to your desktop...name it something related to the screen your capturing... BE SURE TO SAVE IT AS A .JPG ...otherwise it may be to big to upload... after typing in any response you have... click on Upload a File to add the screenshot.
Screenshot instructions are provided to assist those that may read this topic but are not yet aware of the “how to”.
Oh no! Well, I'll learned my lesson the hard way  . Thank you for providing the link--I'm reviewing that information now. At this point, it's not entirely clear to me which are alterative solutions and which are multiple steps within the same solution. For example, the video at that site states that the files on the RAW drive must be first recovered using a software tool before reformating the drive to NTSF. It's also not clear whether (1) the command D:\ FS: :NTSF and (2) Disk Management to convert RAW to NTSF are alternative approaches OR two steps within the same approach. This is all new to me, so I'll need some time to go through it. Thank you so much for your help--your expertise is TRULY appreciated!!
. Thank you for providing the link--I'm reviewing that information now. At this point, it's not entirely clear to me which are alterative solutions and which are multiple steps within the same solution. For example, the video at that site states that the files on the RAW drive must be first recovered using a software tool before reformating the drive to NTSF. It's also not clear whether (1) the command D:\ FS: :NTSF and (2) Disk Management to convert RAW to NTSF are alternative approaches OR two steps within the same approach. This is all new to me, so I'll need some time to go through it. Thank you so much for your help--your expertise is TRULY appreciated!!Methods one and two are the suggested as they are done from within Windows and therefore there is no fee to be paid.
Just so that you are aware, even if we could see any data on the drive none of the options (including the paid one) are guaranteed to recover any of the data let alone all of it.
Scan the drive with Recuva which is free, if that finds nothing the data is not there.
You are welcome and good luck
Just so that you are aware, even if we could see any data on the drive none of the options (including the paid one) are guaranteed to recover any of the data let alone all of it.
Scan the drive with Recuva which is free, if that finds nothing the data is not there.
You are welcome and good luck
I'm running Recuva now, having selected the Deep Scan option. It's showing >124,000 files found at 78% progress. I've been watching youtube videos while waiting, and one stated that "Recuva has a negative effect on the quality of file recovery," but, of course, they are a competitor selling an alterative product! Please advise on next step after the scan has completed--I assume the only option is to save the found files and hope for the best?
Please advise on next step after the scan has completed-
You need to follow the steps provided by Recuva, once you have any files saved you then try methods one and two at the previous link that was provided, if neither method helps you then have the option of purchasing EaseUS Partition Master, we are giving you free help and options and at the end of the day only yourself can decide if you wish to put money into this.
Tip
If using a computer and not a mobile phone, please avoid adding multiple posts while waiting for us to reply to your last, edit your last post to include anything that you wish to add, this will ensure nothing gets overlooked which can sometimes happen if a thread has more than one page + it avoids filling up folks inbox
I do appreciate your help and am happy to pay you for your time. Do you have a PayPal account? The Recuva scan is complete: [D:] FAT32, 233 GG, Cluster size: 32768; Found 2,388 files. Although >2,300 files were found, most are listed as Unrecoverable due to being overwritten. I don't know if there is any hope at this point or not. It may be that I would have the same problem even if I purchased data recovery software. Again, I REALLY appreciate your help but feel like I'm over my head here, so I'm thinking about looking for a local data recovery company to see if they can recover the files. At this point, I'm viewing the list of files identified by the Recuva scan but have not Selected/Recovered anything, partly out of fear of any possible negative consequence, and partly because most of the files are not listed as recoverable anyway. Again, even if this is the end of your advice, I'm happy to pay you for your time if you will provide me with the necessary PayPal information.
Thank you for the kind thought bur really not necessary, I do this for free and my reward is helping others to save money if we can.
I have lost count how many people in the past have argued that you don`t need to keep plenty of room on a storage device to avoid the data on the device being overwritten, you can vouch that this is the case now and I am sorry to hear it
Please be aware that data recovery services are extremely expensive and that they will not offer you any guarantee of recovering anything off the drive at all.
Although >2,300 files were found, most are listed as Unrecoverable due to being overwritten.
I have lost count how many people in the past have argued that you don`t need to keep plenty of room on a storage device to avoid the data on the device being overwritten, you can vouch that this is the case now and I am sorry to hear it
Please be aware that data recovery services are extremely expensive and that they will not offer you any guarantee of recovering anything off the drive at all.
Thank you so much for your time and expertise. I'm very grateful for that! Please consider this thread concluded. I'm a new member and, if there is a specific step to be taken to mark a thread as concluded, I could not find it in either the FAQ or the Term and Rules.
You are welcome and have let us know that you no longer require assistance which is all that we ask
- Status
- Not open for further replies.