• Hi there and welcome to PC Help Forum (PCHF), a more effective way to get the Tech Support you need!
    We have Experts in all areas of Tech, including Malware Removal, Crash Fixing and BSOD's , Microsoft Windows, Computer DIY and PC Hardware, Networking, Gaming, Tablets and iPads, General and Specific Software Support and so much more.

    Why not Click Here To Sign Up and start enjoying great FREE Tech Support.

    This site uses cookies. By continuing to use this site, you are agreeing to our use of cookies. Learn More.

Ex. Harddrive overwritten lost 2TB data

Status
Not open for further replies.

Hichaos

PCHF Member
Feb 16, 2020
14
0
32
Hey guys i lost 1.863,01 gb.

I wanted to reinstall my win10 so i accedently Made my 2tb drive a Boot drive for the Installation. I used the media creation programme of Microsoft.

I tryed some recovery programs but all started as cost free and went like 50€ + after scanning. Is there a way to get my data back without paying 50€ ?

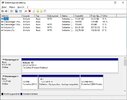
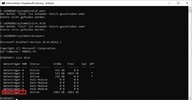
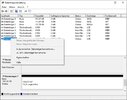
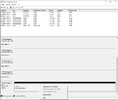
The HDD isnt visible in the explorer only if I check it via cmd or the harddrive partition program of win10. I tryed a method with disk part but it didn't work because I had no volume to assign the partition to.

You already know I'm not really well known with this harddrive xxxx and my english could be better. If you need anymore information I'm ready to answer.
 
Welcome to PCHF Hichaos,

Give Recuva free a try, download from here

If no luck with Recuva you could try a live Linux distro, we can provide the steps for this should you need them.
 
I encountered a problem my explorer doesn't find that external hdd same with recuva so I can search directly and if I search for my whole PC he has 7 disks but after 3 and 6 he doesn't search the 7 and 7 is the ex hdd I think
 
We could do with an expanded screenshot of Disk Manager.

Access Disk Management via Run.

Press the Windows+R keys to open Run, type diskmgmt.msc in the empty box then press OK.

To capture and post a screenshot;

Click on the ALT key + PRT SCR key..its on the top row..right hand side..now click on start...all programs...accessories...paint....left click in the white area ...press CTRL + V...click on file...click on save...save it to your desktop...name it something related to the screen your capturing... BE SURE TO SAVE IT AS A .JPG ...otherwise it may be to big to upload... after typing in any response you have... click on Upload a File to add the screenshot.

Screenshot instructions are provided to assist those that may read this topic but are not yet aware of the “how to”.
 
  • Like
Reactions: Hichaos
As i sad the disk isnt showing there, but its visible with cmd diskpart.

Currently im running recuva in deep mode just to see if the disk is found there but i cant select the 7 disk so i need to run it over multiple disk ( i could just unplug the disks >:> but then i need to turn off pc open it etc. and im still able to do **** i need to do since as you can see i have enough other disks)

Still the files on this 2 Tb disk are important to me^^
 

Attachments

  • DIskmgmt.msc.jpg
    DIskmgmt.msc.jpg
    118.6 KB · Views: 9
  • CMD.DIskpart.jpg
    CMD.DIskpart.jpg
    100.8 KB · Views: 10
is it possible to make a new volume without format the disk and will the data then not be overwritten by creating a new partition and then i can run recuva to recover the data ? is that possible?
 
Apologies for the delay getting back to you, had a busy couple of work days :(

Your English is far better than my German but what I can see and understand from a couple of your screenshots is that this external USB HDD has 1863GB of free space on it that are shown by DISKPART to be dirty and by Disk Manager to be not assigned, the latter you can address by following the steps here but being defined as both dirty and free space I will be honest and advise you to expect the worst.

Let us know if you would like the Puppy Linux guide to attempt to access the drive, I will not post it unless you ask as the info is quite a chunk to follow.
 
As you can see in the screenshot no option to assign a letter. I need to ask a question about Linux part it sound like a operating system and i never had linux will linux just read the disk waht are the chance linux will help in my situation? Im quick tired of trying to fix my ex hddd tbh.

Lets be short and give me the guide for puppy linux maybe it helps if it doesnt work i give up on the data and live on xD
 

Attachments

  • datenmangr.jpg
    datenmangr.jpg
    114.5 KB · Views: 9
Did you right click in the space beneath the black bar where it says 1863.01 GB Not assigned.

Puppy Linux uses the RAM to boot and does not require any installation to a storage device, there are two options to choose from, burn to disk and save to a USB thumbdrive, it will only cost you your time and any blank disk or thumbdrive should you need to purchase either to be able to proceed.

Please do not feel obliged to follow any steps that may be suggested here but keep in mind that our help is offered for free whereas a data recovery service that while costing a small fortune will not give you any guarantee of recovering anything at all from the drive.
 
Did you right click in the space beneath the black bar where it says 1863.01 GB Not assigned.
Can you also answer the above for us.

If your computer has a disk burner I suggest you use the disk method as you may need to disable secure boot for the computer to be able to boot from a USB device, this can sometimes be problematic whereas booting from the optical drive is straight forward, the blank disk only needs to be the CD type.
 
Thanks and you are quite correct as the above are intended to be used when you want to create new partitions on a drive, as mentioned in my reply #10 the USB is shown to have 1863GB of free space which is how Windows reads it, in layman`s terms this = either a blank drive or data on the drive that is unreadable or as DISKPART describes it "dirty".
 
===================

***Required Hardware***

CD Burner (CDRW) Drive,

Blank CD,

Extra Storage Device (USB Flash Drive, External Hard Drive)


===================


1. Save these files to your Desktop/Burn Your Live CD:

2. Set your boot priority in the BIOS to CD-ROM first, Hard Drive Second

    • Start the computer/press the power button
    • Immediately start tapping the appropriate key to enter the BIOS, aka "Setup"

      (Usually shown during the "Dell" screen, or "Gateway" Screen)
    • Once in the BIOS, under Advanced BIOS Options change boot priority to:

      CD-ROM 1st, Hard Drive 2nd
    • Open your ROM drive and insert the disk
    • Press F10 to save and exit
    • Agree with "Y" to continue
    • Your computer will restart and boot from the Puppy Linux Live CD


      4 BIOSBootPriorityImage.png


3. Recover Your Data

  • Once Puppy Linux has loaded, it is actually running in your computer's Memory (RAM). You will see a fully functioning Graphical User Interface similar to what you normally call "your computer". Internet access may or may not be available depending on your machine, so it is recommended you print these instructions before beginning. Also, double clicking is not needed in Puppy. To expand, or open folders/icons, just click once. Puppy is very light on resources, so you will quickly notice it is much speedier than you are used to. This is normal. Ready? Let's get started.


    3a. Mount Drives
    • Click the Mount Icon located at the top left of your desktop.
      5 Puppy Linux Mount Icon.PNG

    • A Window will open. By default, the "drive" tab will be forward/highlighted. Click on Mount for your hard drive.
    • Assuming you only have one hard drive and/or partition, there may be only one selection to mount.
    • USB Flash Drives usually automatically mount upon boot, but click the "usbdrv" tab and make sure it is mounted.
    • If using an external hard drive for the data recovery, do this under the "drive" tab. Mount it now.

  • 3b. Transfer Files.
    • At the bottom left of your desktop a list of all hard drives/partitions, USB Drives, and Optical Drives are listed with a familiar looking hard drive icon.
    • Open your old hard drive i.e. sda1
    • Next, open your USB Flash Drive or External Drive. i.e. sdc or sdb1
    • If you open the wrong drive, simply X out at the top right corner of the window that opens. (Just like in Windows)
    • From your old hard drive, drag and drop whatever files/folders you wish to transfer to your USB Drive's Window.

  • For The Novice: The common path to your pictures, music, video, and documents folders for XP is: Documents and Settings >> All Users (or each individual name of each user, for Vista and above C:\Users\$USERNAME\[...]. CHECK All Names!) >> Documents >> You will now see My Music, My Pictures, and My Videos.


    Remember to only click once! No double clicking! Once you drag and drop your first folder, you will notice a small menu will appear giving you the option to move or copy. Choose COPY each time you drag and drop.


    YOU ARE DONE!!! Simply click Menu >> Mouse Over Shutdown >> Reboot/Turn Off Computer. Be sure to plug your USB Drive into another working windows machine to verify all data is there and transferred without corruption. Congratulations!


    PuppyLinux528screenshot.png


For computers that have UEFI as opposed to legacy BIOS, to be able to boot from your USB device you may need to disable secure boot and change UEFI to CSM Boot, not all computers and BIOS are the same, please refer to your user manual if you have one as the following steps are only one such example.

Restart the computer, Windows 8 and 8.1 from the Start or desktop screen move your mouse pointer over the upper or lower right corner of the screen, when the Windows Charms appear click the Settings Charm, click on Power and then the Restart option.

Windows 10, Click on Start,Power and then Restart.

While the computer is re-starting,you will need to continually tap or hold down the particular key that will allow you to access the BIOS on your computer, we will use the F2 key as an example here;

After restarting the computer, when the screen goes black, press and hold down the F2 key, wait for the BIOS to load.

Select Security -> Secure Boot and then Disabled.

Select Advanced -> System Configuration and then Boot Mode.

Change UEFI Boot to CSM Boot.

Save the changes and Exit the BIOS, commonly F10.

If your computer will not boot into Windows at all, power up or restart the computer continually tap or hold down the key that will allow you to access the BIOS on your computer and then do the following;

Select Security -> Secure Boot and then Disabled.

Select Advanced -> System Configuration and then Boot Mode.

Change UEFI Boot to CSM Boot.

Save the changes and Exit the BIOS, commonly F10.
 
Status
Not open for further replies.